Sometimes you may reach a point where the only way to get your PC back to normal is a clean Operating System, but this will often lose your files, software and settings. However, there is another method to try before a full new install, and this is often called a repair install or a refresh depending on the Operating System you have.
In Windows 8 we have a Refresh PC option that allows you to keep your files and personal settings but will reset everything else to factory defaults. Anything that you previously downloaded from the App Store will be removed and will have to be re-downloaded after. It’s a simple process and we’ll break it down below step by step.
You may want to print out these instructions so you can follow along while the computer restarts, etc.
IMPORTANT – You need Windows 8 installation media to complete this process. This is the DVD or USB that came with your computer. You can also create a USB here: Windows 8 USB
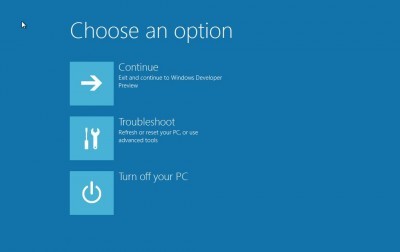
1.Restart the computer or turn it on and immediately start pressing F8. This will take you into the Windows Recovery Menu.
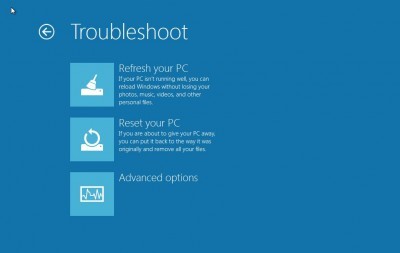
2. Click on the Troubleshoot option in the list (See photo below).
3. In the new list, look for the Refresh your PC option and click on it (See photo below).
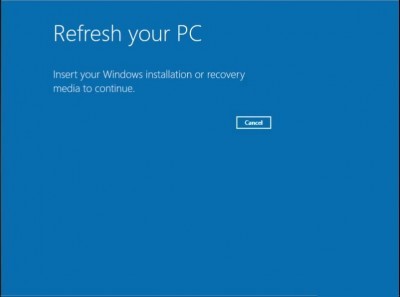
4. You will now be prompted to insert your installation media. This is in a DVD or USB format.
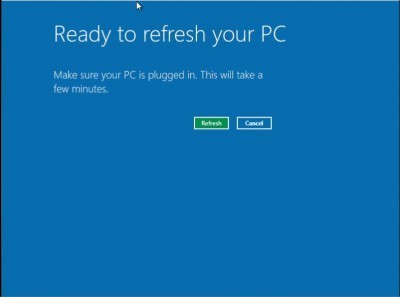
5. After inserting the installation media, your computer will detect it automatically. After it does you can click the Refresh button to start the process.
6. Your computer will now start the repairing process and will most likely reboot, don’t interfere with it until it has completed.
7. That’s it, your computer will tell you when the process has finished and you’ve completed the Windows 8 refresh process.
Original guide and pictures from The Windows Club can be found here: Original

