by David Hartsock for Daves Computer Tips
In the past few issues I’ve covered basic considerations you should plan for before installing Windows Home Server 2011 and the actual installation of WHS 2011. I plan to continue the series but before I get started I wanted to share the fact that Microsoft has greatly lowered the price of this great software! It can be had for as little as
$59.99 at NewEgg. This is a very worthwhile investment for anyone with two, or more, PC’s in their home, who wants to stream media to multiple computers or TV’s in their home, or who wants simple and effective automated computer backups. In my opinion the backup feature alone is worth the price of admission! You will need a PC, but it doesn’t have to be anything fancy. Any old unused PC with a 64-bit 2GHz CPU, 2GB RAM, and at least 160GB hard drive can have you up and running in short order – you don’t even really need a monitor, keyboard, or mouse! If you don’t have one lyiing around it should’t be hard to find an unused PC from a friend or family member that meets the minumum requirements – it doesn’t have to look pretty. If you are feeling adventurous you can build one for next to nothing.
Installing the Windows Home Server Connector Software
The Connector is a small piece of software that installs on the clients (the computers you use in your home) that communicates, or “connects”, with the server. The connector software also allows easy access to the shared folders on the server, remote web access, manual backup initiation, and the Dashboard (where the server is managed). The Connector is required to be installed on any computer in the home that you wish to backup on the home server.
Connecting to the server
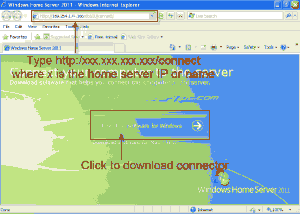
The Connector software is located on the server itself so you will never have to remember where you left “that” CD or what website the installer was on. Simply open a browser on each client computer and navigate to the software location. In the example below I’ve entered http:// followed by the IP address of the server and /connect/. You can also use the server name you chose during installation. As an example; if your server IP address is 192.168.0.100 the address would be http://192.168.0.100/connect/ or you could use the server name (testserver in this example) and type http://testserver/connect/ into the address bar. Press the Enter key and you’ll be greated with the following page.
Click the Download software for Windows button on your Windows computers or the Download software for Mac link for Mac users and you’ll be asked whether you would like to Run, Save, or Cancel the download. You don’t need to save the file as it will always be on the server, so click Run.
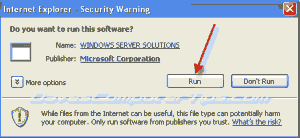
You will receive the standard warning when attempting to open an executable file. Click Run to begin the Connector installation.
Article continued here
This excerpt is shared with permission from davescomputertips.com.


