![]()
by Mitz Pantic from Tips4pc.com
How to Create a New Power Plan for Your Win7 Laptop
A computer bought today will come pre-configured in the power saving mode so that it will consume minimum amount of power. That means, if you leave your laptop alone for a while, the display will become deemed after five minutes or so, or it will automatically turn off itself after ten minutes. When you are not touching your PC or laptop for a certain pre-defined period, it thinks you have left for the day, and it is ok to wrap things up and go to the sleep mode. This is a good ploy to save power most of the time, but there could be instances when doing so will put you into some awkward situations. Like for example, if you are in a business meeting doing a power point presentation in front of a large number of audience and your laptop’s screen goes blank frequently, could be a matter of discomfort for you as well as for the audience. You want it to act differently during the presentation session by staying “on”.
In a circumstance like this, the best solution for you would be to create a new power profile that you could switch on to for a certain time. You can always switch back to your power saving mode later on once you are done with the presentation. With windows 7 power management feature, you can easily setup multiple power profiles based on requirements and to save yourself from interruptions as mentioned above.
Create a New Power Plan
To get a new power profile for you in your laptop:
1. Click on “control panel” first from the “start menu”.
2. Go to the “System and security” option.
3. A new window will appear with several other options. Here you click on the “power options”.
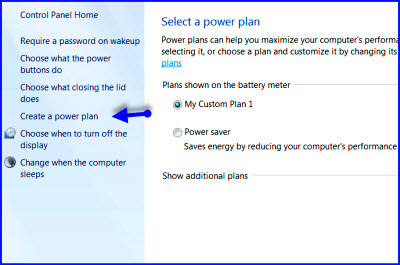
4. Another screen will appear as shown in image 1 below. Here you can do several things to manage or create a power profile.

5. Since I already have a power profile created for me, the screen is showing “my custom plan1” and the default “power saver” plan. Your case could be different, if you haven’t created any plan yet. To create a power plan for you, let’s click “create a power plan” option as shown by the arrow sign.
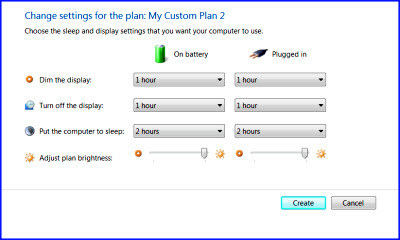
6. You will reach the plan setup screen as shown in image 2 below where you have to provide the parameters based on your choice.

You will see there are two columns for two modes of operation. One is when your computer is getting power from the battery and the other when you are connected with the main supply power. Here you may change the parameters of various options available. For example, change “dim the display” to 1 hour instead of 5 minutes and “turn off the display” time to 1 hour, and “put the computer to sleep” to 2 hours. By doing this, you are telling your PC to stay alive at least for 1 hour even if you are away from it for that amount of time. You should set the parameters for both the “battery operated” mode and the “plugged in” mode so that the new power plan will work in any situation.
7. Once you have set the parameters, hit the create button. Your new power profile will be created.
You have two power profiles now – one is the power saver profile that was always there and a new profile you just created.
Switch from One Power Plan to Another
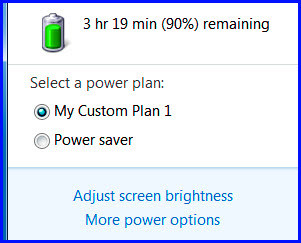
To switch back and forth between the two, you can click on the power/battery icon on the task bar as shown in image 3 below. Here you can enable the profile you want based on your specific need. You can do the same by going into the “select power plan” screen from the control panel as shown in image 1.

It is worth mentioning here that unless you have a very specific requirement, it is always better to use the power saver mode, as this way you can save lots of electricity over a long period of use.
This post appears with permission from Tips4PC.com.


